How to Create an AWS S3 Bucket

Hi there, when it comes to online storage, look no further than AWS S3 buckets.
Amazon Simple Storage Service (Amazon S3) is an object storage service that offers industry-leading scalability, data availability, security, and performance. This means customers of all sizes and industries can use it to store and protect any amount of data for a range of use cases, such as websites, mobile applications, backup and restore, archive, enterprise applications, IoT devices, and big data analytics. Amazon S3 provides easy-to-use management features so you can organize your data and configure finely-tuned access controls to meet your specific business, organizational, and compliance requirements. Amazon S3 is designed for 99.999999999% (11 9’s) of durability, and stores data for millions of applications for companies all around the world.
Today we are going to learn how to set one up. We will be looking at how to “create an S3 bucket on AWS” step-by-step. Well start by using the AWS Management Console 🖥, then follow up with using the Command Line 📺, and finish off with a quick terraform config 📝.
I’m going to assume that you already have an AWS account. If not, head to https://aws.amazon.com and sign up. You will have to give your credit card details and it will charge you around $1 to verify your account, but once verified they reverse the charge.
Lets get started.
Console
Step 1
Once you’re logged into the aws console at https://console.aws.amazon.com and select S3 from services menu.

Once in the S3 service’s console, click Create Bucket.

Step 2
Now on the Create Bucket screen, Fill out the name and select region you want the bucket to reside in.
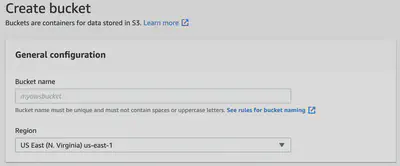
S3 bucket names are global which means they must be unique, you cannot use a name which has been used by anyone else.
US East (N. Virginia) is AWS default location.
Step 3
In the next section, Bucket settings for Block Public Access, you basically apply a limit on the ability to set public access on your bucket.
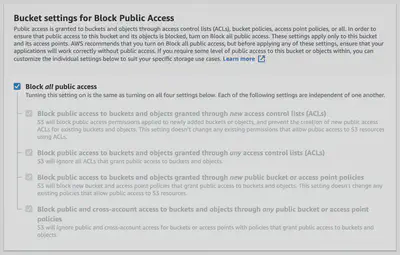
This has been a big topic over the last few years. Many of the data breaches in the news have occured through this type of risk, where too much access is granted and a bucket is made accessible by the public, so AWS has enabled this type of control to prevent accidentally enabling public access.
Step 4
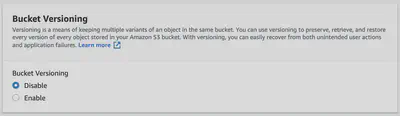
Versioning
Click the enable option to activate object versioning on the bucket. This is a means of keeping multiple variants of an object in the same bucket. You can use versioning to preserve, retrieve, and restore every version of every object stored in your Amazon S3 bucket. With versioning, you can easily recover from accidental overwrites or deletions. When you enable versioning for a bucket, if Amazon S3 receives multiple write requests for the same object simultaneously, it stores all of the objects.
Step 5
Encryption
You can set default encryption on a bucket so that all new objects are encrypted when they are stored in the bucket. When you use server-side encryption, Amazon S3 encrypts an object before saving it to disk and decrypts it when you download the objects. The easiest way to do this, is to let AWS manage the keys for you, so choose Amazon S3 Key. You do have the option to use the keys you manage yourself in Amazon KMS.

Step 6
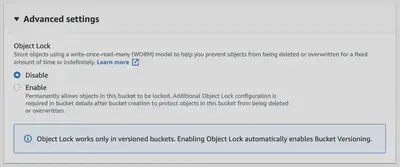
Advanced settings
At the time of writing this post, the only option is to enable object locking. This prevents accidental deletion of an object. I’ll leave this option for you to decide if you want to enable it.
Step 7
Click Create Bucket

And there you have it, you have a new bucket ready for you to upload objects to.
Command Line
AWS provides 2 APIs for controlling S3 buckets. They are called s3api and s3.
s3api provides a one-to-one mapping of the actual API methods and it’s output closely follows the json models. Therefor this should be your preferred method.
The s3 command makes it easier to interact with S3, but in the background it relies on the s3api command anyways…
Step 1
The following command creates a bucket named my-bucket in the eu-west-1 region.
Regions outside of us-east-1 require the appropriate LocationConstraint to be specified in order to create the bucket in the desired region:
aws s3api create-bucket --bucket my-bucket --region eu-west-1 \
  --create-bucket-configuration LocationConstraint=eu-west-1
Output 🖨:
{
    "Location": "http://my-bucket.s3.amazonaws.com/"
}
Step 2
Block Public Access
Remember that Block Public Access from before? Well you can do it from the CLI as well.
The following put-public-access-block example sets a restrictive block public access configuration for the specified bucket.
aws s3api put-public-access-block \
    --bucket my-bucket \
    --public-access-block-configuration "BlockPublicAcls=true,
IgnorePublicAcls=true,BlockPublicPolicy=true,RestrictPublicBuckets=true"
Step 3
Enable versioning on the bucket
The following command enables versioning on a bucket named my-bucket:
aws s3api put-bucket-versioning --bucket my-bucket \
  --versioning-configuration Status=Enabled
This command produces no output.
Step 4
Enable Encryption on the entire bucket
To configure server-side encryption for a bucket
The following put-bucket-encryption example sets AES256 encryption as the default for the specified bucket.
aws s3api put-bucket-encryption \
    --bucket my-bucket \
    --server-side-encryption-configuration '{"Rules":
                                             [{"ApplyServerSideEncryptionByDefault":
																								{"SSEAlgorithm": "AES256"}
                                               }
                                             ]
                                             }'
This command produces no output.
Step 5
Advanced Settings like Object Locking
aws s3api put-object-lock-configuration \
    --bucket my-bucket-with-object-lock \
    --object-lock-configuration '{ "ObjectLockEnabled": "Enabled", "Rule": { "DefaultRetention": { "Mode": "COMPLIANCE", "Days": 50 }}}'
You have just completed all of the same steps as the console above, but now you have commands that you can script and use in your CI tools.
Terraform 🌍
Terraform is a way to provide commitable immutable infrastructure-as-code to deploy your infrastructure. If you dont have it, download it at https://www.terraform.io/.
resource "aws_kms_key" "mykey" {
  description             = "This key is used to encrypt bucket objects"
  deletion_window_in_days = 10
}

resource "aws_s3_bucket" "b" {
  bucket = "my-bucket"
  acl    = "private"

  block_public_acls   = true
  block_public_policy = true

  versioning {
    enabled = true
  }

  server_side_encryption_configuration {
    rule {
      apply_server_side_encryption_by_default {
        kms_master_key_id = aws_kms_key.mykey.arn
        sse_algorithm     = "aws:kms"
      }
    }
  }

  tags = {
    Name        = "My bucket"
  }

}
Feel free to copy this, and use a terraform plan to confirm it will work in your environment.
You can always contact me to learn more how to better build your buckets using terraform. This is just a quick config to get a basic bucket up and running.
Also, feel free to read Hashicorp’s documentation on the AWS S3 TF Module. https://registry.terraform.io/providers/hashicorp/aws/latest/docs/resources/s3_bucket
OK, I hope all of the info really helps you get your buckets up and running. Thanks as always! 👍